Mobile phone app (iOS)
The NBT Personalization mobile phone app (view on GitHub) is a Swift-based Xcode project which demonstrates the personalization of the OPTIGA™ Authenticate NBT via NFC (PERSO).
Installation
Instructions to build the app and install it on an iOS device can be found in the README file of the GitHub repository (view on GitHub).
Software architecture
The application is structured using the MVVM (Model-View-ViewModel) pattern and
utilizes the modules of the OPTIGA™ Authenticate NBT Host Library for Swift. The library modules are
included in the Libraries/optiga-nbt-lib-swift folder and added as
dependencies to the Xcode project.
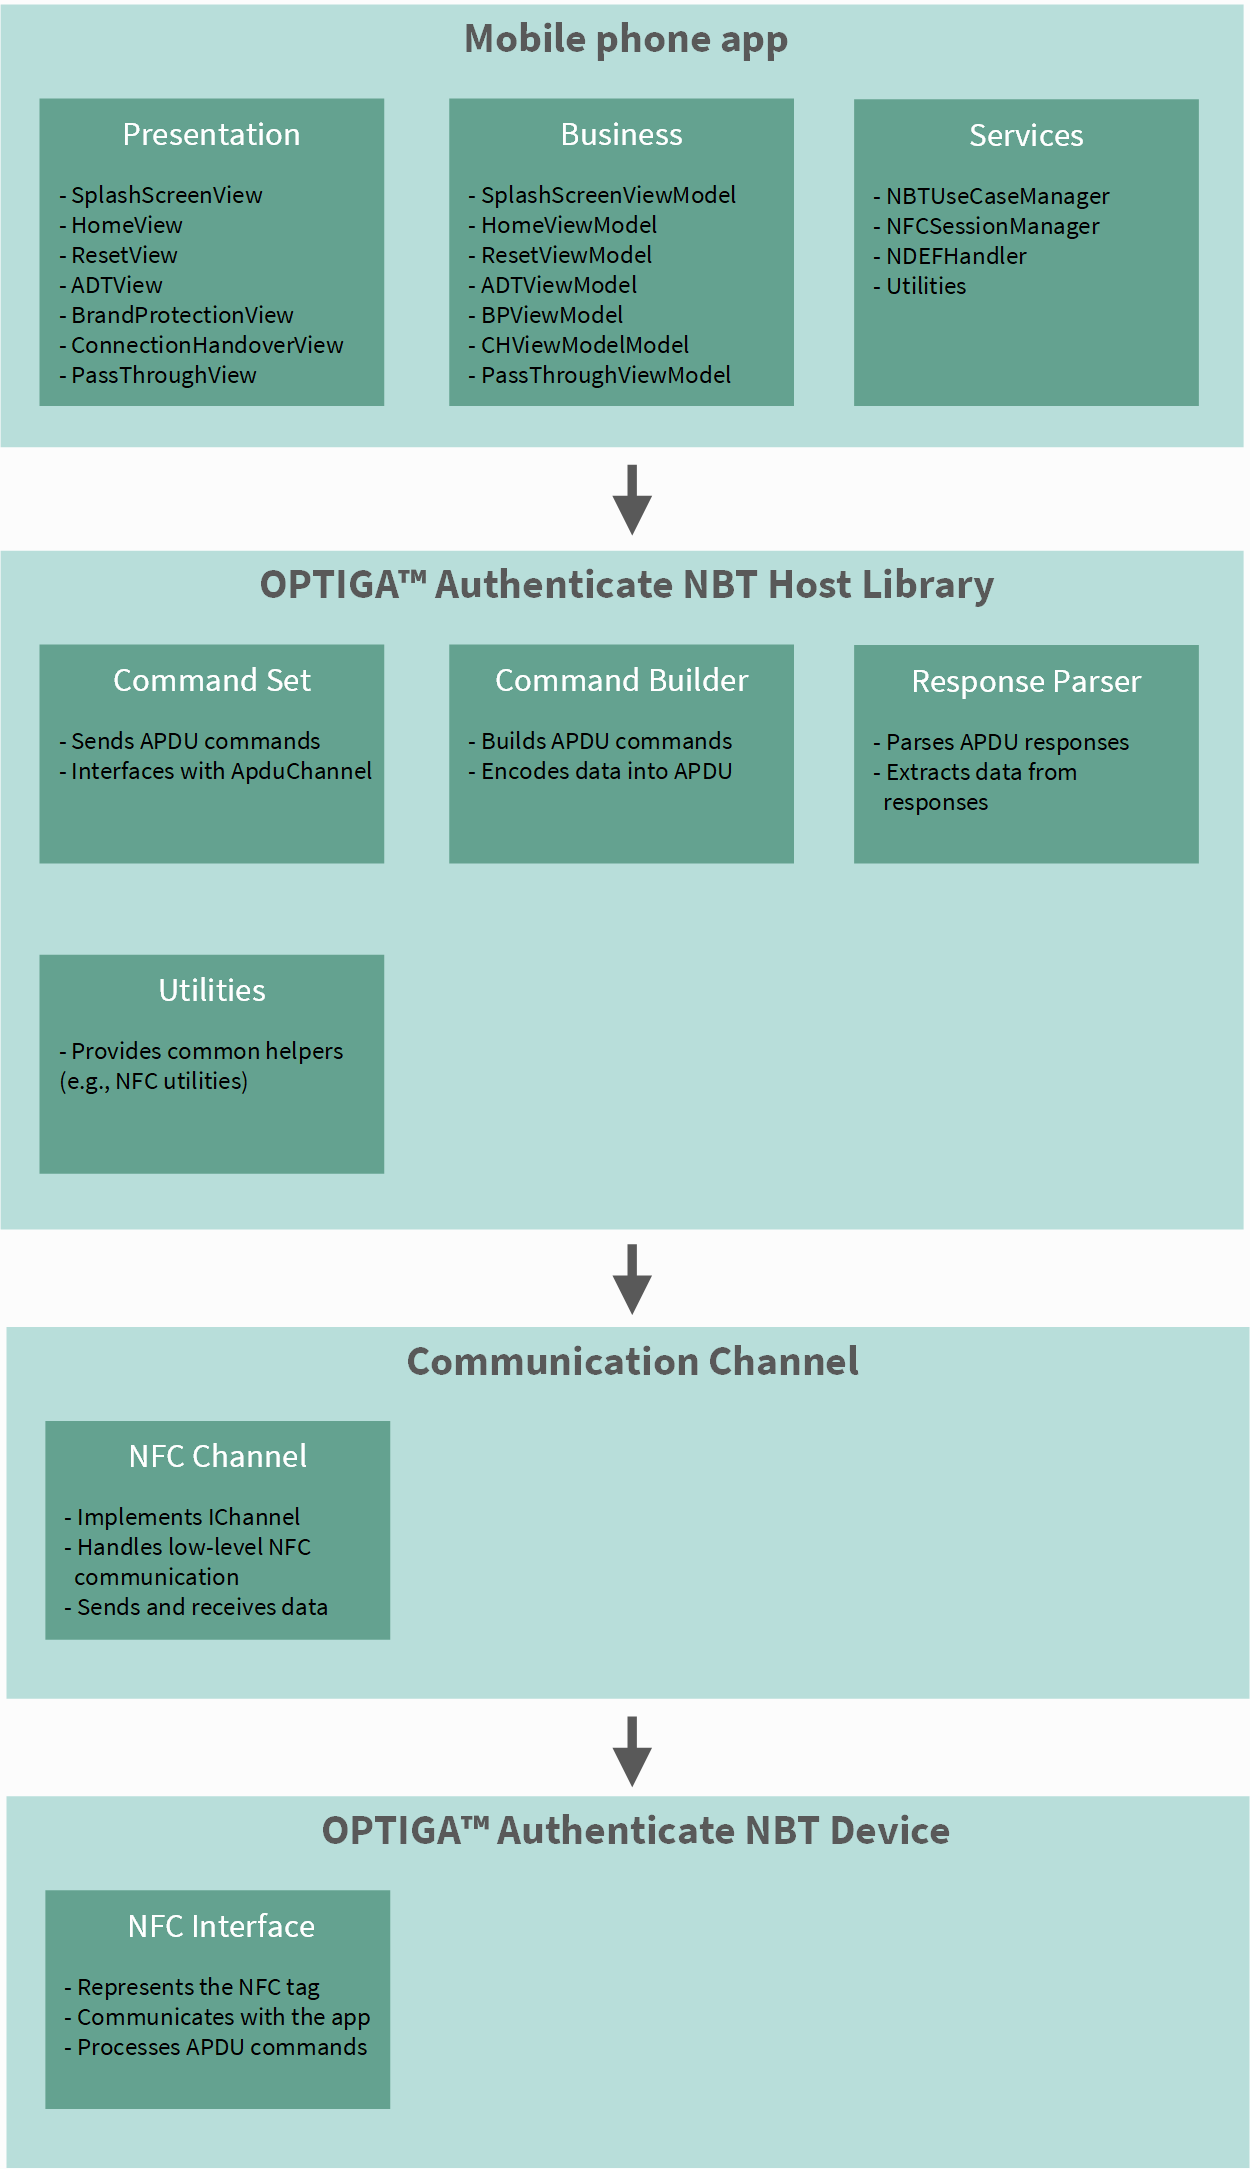
Fig. 125 High-level software architecture of the iOS app.
Components
Mobile application:
HomeView: Displays the main interface for selecting personalization use cases.
PersoUseCaseManager: Manages the personalization use case logic, including file access policy configurations and interface settings.
PersoViewModel: Handles the business logic for the PERSO use case, including user interactions and data binding.
OPTIGA™ Authenticate NBT host library (in Libraries/optiga-nbt-lib-swift):
CommandSet: APIs for sending APDU commands.
CommandBuilder: Constructs APDU commands.
ResponseParser: Parses responses from the NFC tag.
Communication channel:
NfcChannel (from Libraries/InfineonChanneliOSNfc): Implements the communication interface for NFC using Core NFC.
NFCSessionManager (in Services/): Manages Core NFC sessions and tag communication.
Application flow
The first view to be started is the HomeView, showing a main menu
where the user can select a use case configuration. Based on the
selection, a new view is started (for example, the
BrandProtectionView to run the brand protection-specific
personalization).
As soon as the personalization is triggered by tapping the antenna of
the OPTIGA™ Authenticate NBT device to the mobile phone, a use
case-specific method of NbtUseCaseManager is called (for example,
the configureBPUseCase(), which is representing the brand
protection use case configuration). Each use case has a corresponding
method in NbtUseCaseManager that holds all essential configurations
such as a FileAccessPolicy for each file or certain interface
configurations. The personalization itself is started by calling the use
case specific configuration method of the NbtUseCaseManager class
(for example, configureBPUseCase()).
Finally, there is also a NDEF file handler interface (INdefHandler)
providing two ways of handling the NDEF file content. The IOSHandler
is using libraries provided by iOS itself, and the InfineonHandler
is using the libraries provided by Infineon. In both cases ,the methods
createConnectionHandoverNdefMessage() or
createBrandprotectionNdefMessage() are provided.
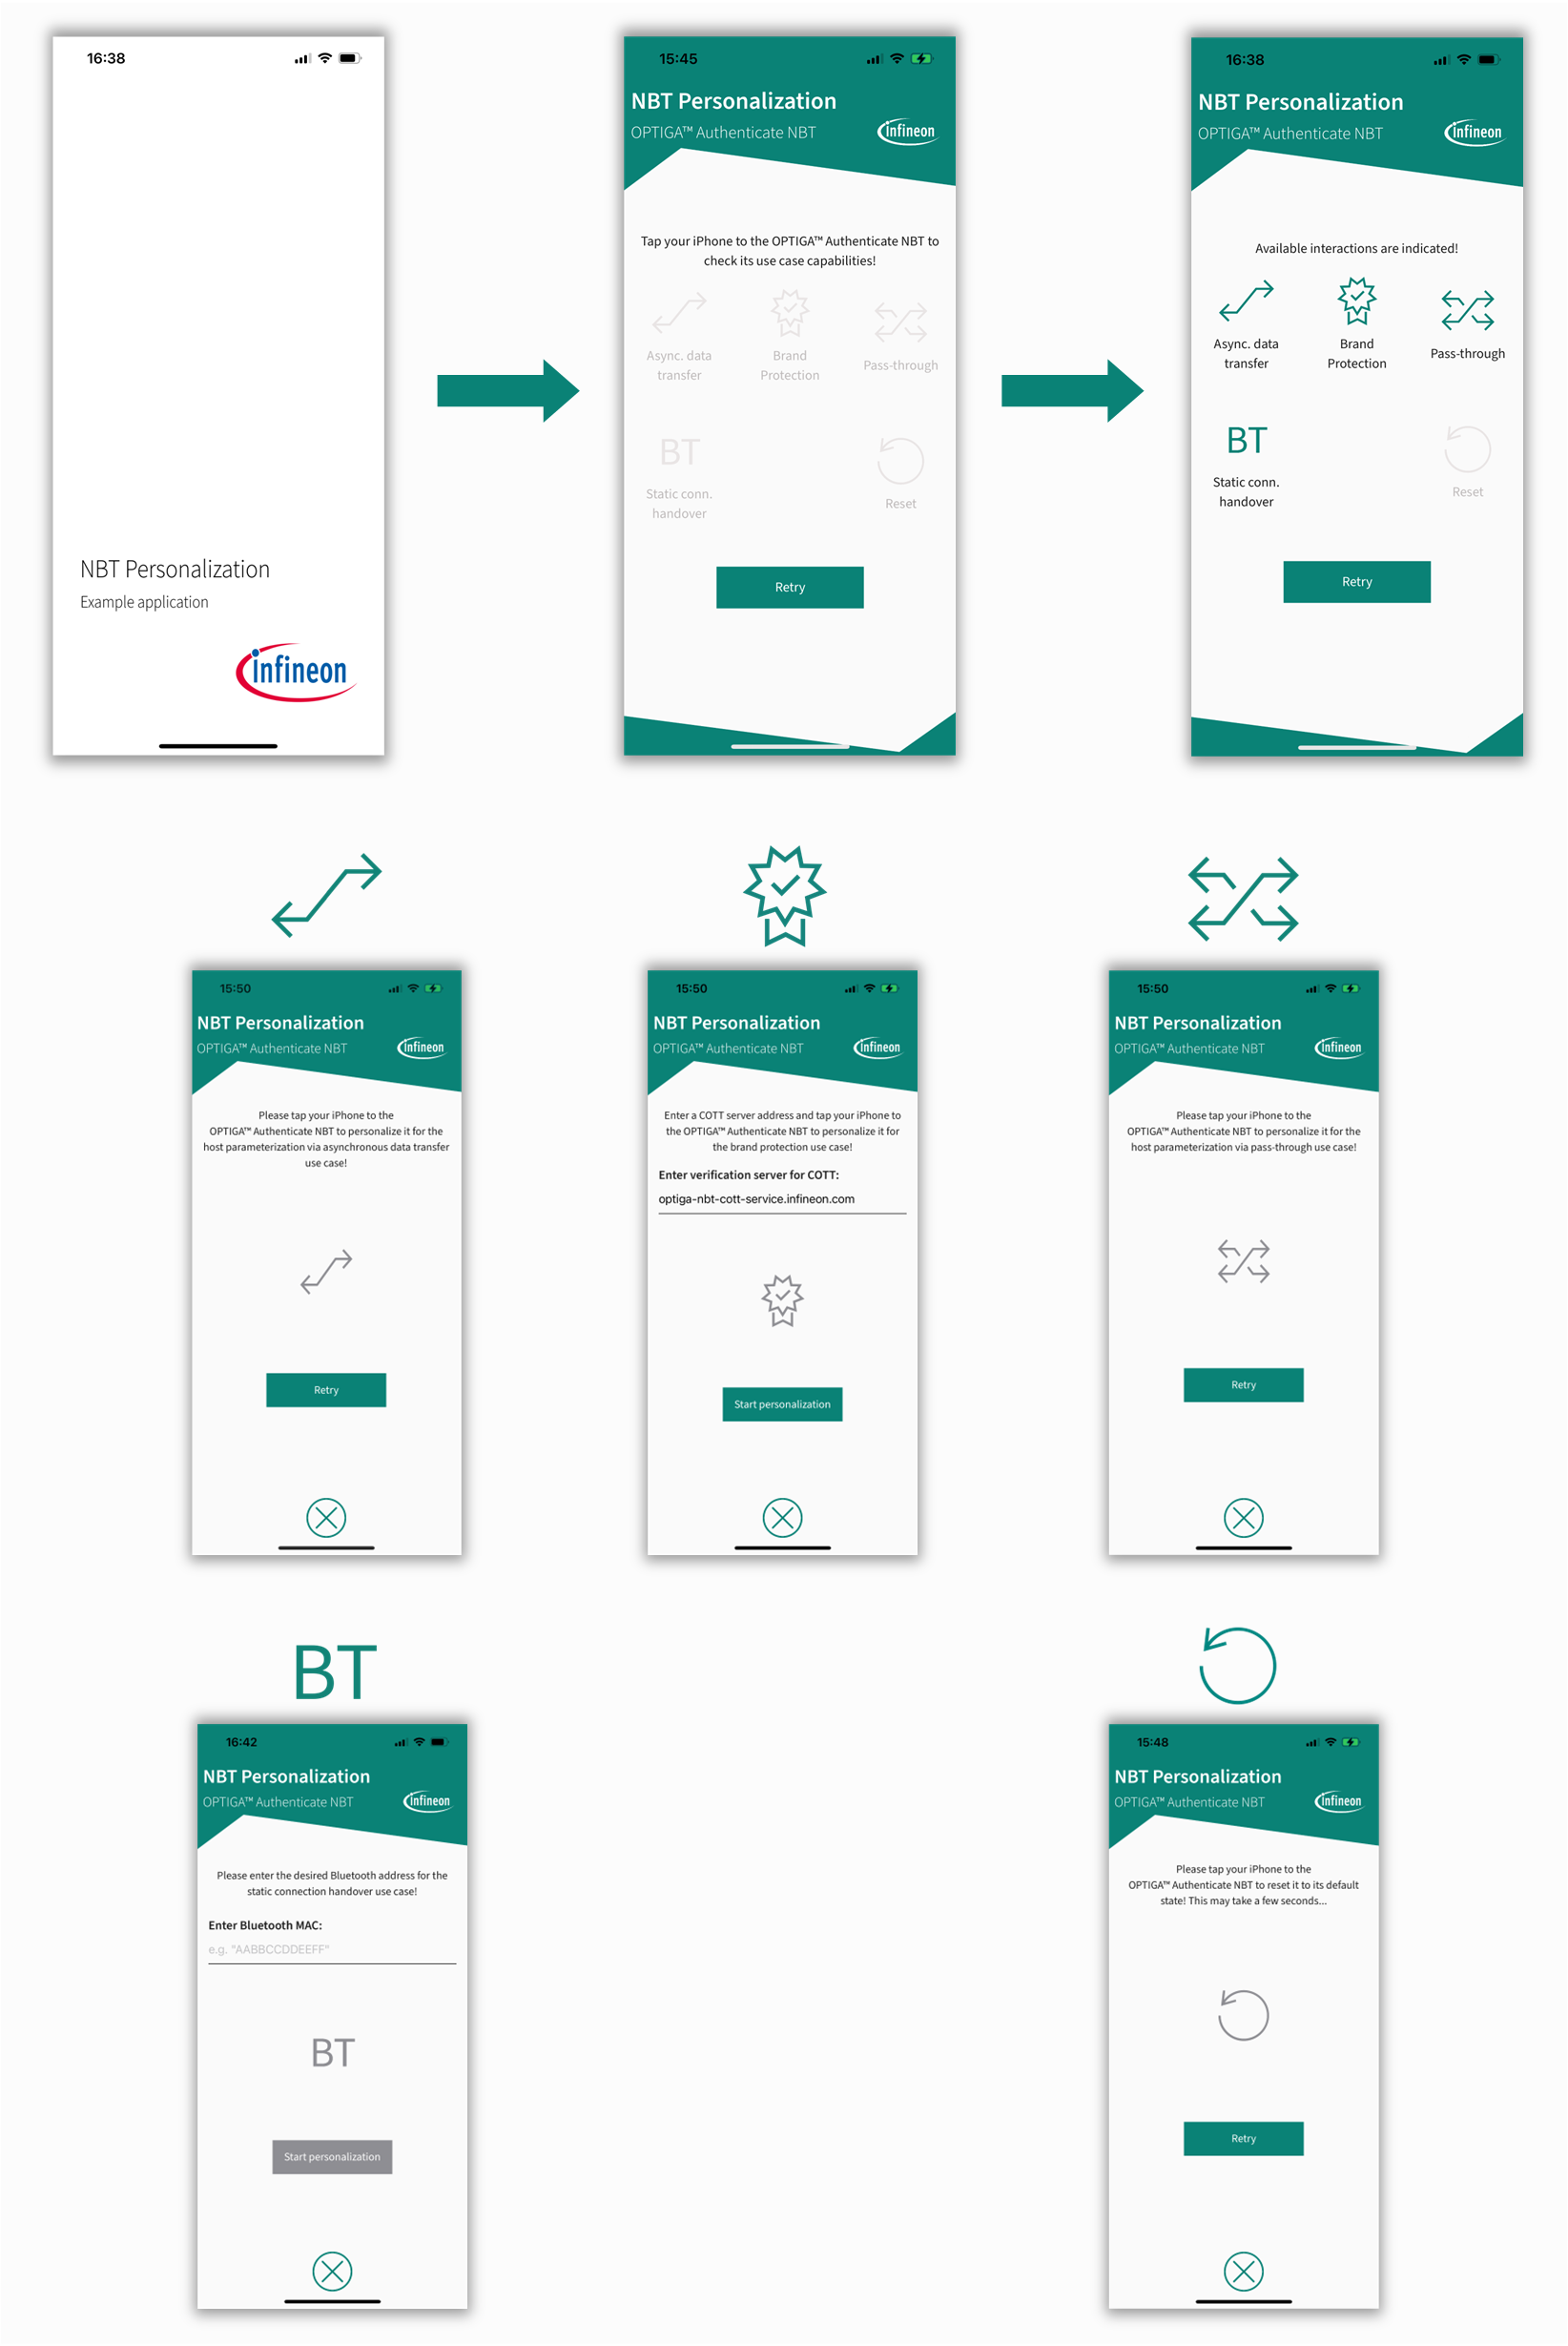
Fig. 126 Visualization of the app’s views during operation.
Application details
The application is developed using Xcode and follows the standard iOS project structure.
Project layout
The project is structured as a standard Xcode project with a modular folder layout:
optiga-nbt-example-perso-ios/
├── docs/                             # Documentation and images
├── InfineonNBTPerso/                 # Main app target
│   ├── Business/                     # Business logic and view models
│   ├── Presentation/                 # SwiftUI views, assets, and resources
│   ├── Services/                     # Service classes (e.g., NFC, logging)
│   ├── InfineonNBTPerso.entitlements # App entitlements
│   └── InfineonNBTPerso.plist        # App configuration
├── LICENSES/                         # License files
├── Libraries/                        # External and internal library modules
│   ├── InfineonChanneliOSNfc/        # Infineon NFC channel library for iOS
│   ├── InfineonConsoleLogger/        # Infineon console logger library
│   └── optiga-nbt-lib-swift/         # OPTIGA™ Authenticate NBT Host Library for Swift
├── InfineonNBTPerso.xcodeproj/       # Xcode project file
├── LICENSE                           # License information
└── README.md                         # Project documentation
Project configuration
This can be done in the project settings in Xcode:
Deployment Target: Set to iOS 15.0 or later.
Swift Language Version: Set to Swift 5.0 or later.
Signing & Capabilities: Ensure the app has the necessary entitlements for NFC access.
Integration of the Swift host library
The OPTIGA™ Authenticate NBT Host Library for Swift is included in the project
as a module. The library provides the necessary APIs for sending APDU commands
to the OPTIGA™ Authenticate NBT device. The library is located in the
Libraries/optiga-nbt-lib-swift folder and is added as a dependency in the
Xcode project. The app uses the library’s APIs to construct and send APDU
commands, handle responses, and manage NFC communication. The library is
structured into several modules, including:
CommandSet: Contains APIs for sending APDU commands to the OPTIGA™ Authenticate NBT device.
CommandBuilder: Provides methods to construct APDU commands.
ResponseParser: Parses responses from the OPTIGA™ Authenticate NBT device.
Usage of NFC in the app
The app uses Core NFC to communicate with the OPTIGA™ Authenticate NBT
device. NFC sessions are managed by the NFCSessionManager class in the
Services layer, using NFCNDEFReaderSession and NFCISO7816Tag for APDU-level
communication.
NFC Capability enabled in Xcode:
In your Xcode project, select your target → Signing & Capabilities tab → click + Capability → add Near Field Communication Tag Reading.
NFC Usage Description:
To comply with App Store guidelines, you must provide a usage description for NFC in your app’s Info.plist file. This informs users why your app needs access to NFC functionality. To add the NFC usage description, you can either edit the Info.plist file directly or use Xcode’s property list editor. The key is NFCReaderUsageDescription, and the value should be a string explaining why your app uses NFC. To add the NFC usage description in the Info.plist file, you can use the following XML snippet:
<key>NFCReaderUsageDescription</key>
<string>This app uses NFC to communicate with the OPTIGA Authenticate NBT device.</string>

This can also be specified in the Xcode project settings.
NFC Entitlement in .entitlements file
To enable NFC functionality, the app must have the appropriate entitlements. The
following key is added to the InfineonNBTADT.entitlements file: This enables
NFC hardware access at the system level.
<key>com.apple.developer.nfc.readersession.formats</key>
<array>
   <string>TAG</string>
</array>
<key>com.apple.developer.nfc.readersession.iso7816.select-identifiers</key>
<array>
   <string>D2760000850101</string>
</array>
This entry allows your app to use Core NFC to select and communicate with
ISO7816 tags that have the specified AID (D2760000850101).
Session handling:
NFC sessions in the iOS app are managed by the NFCSessionManager class,
located in
InfineonNBTADT/Services/NFCSessionManager/NFCSessionManager.swift.
NFCSessionManagerimplements theNFCTagReaderSessionDelegateprotocol.When an NFC operation is required (e.g., the user selects “Read” or “Write”), the app calls
startNFCTagReaderSession(withAlertMessage:):Creates a new
NFCTagReaderSessionfor ISO14443 tags.Sets the delegate to
NFCSessionManager.Starts the session with
.begin()and displays an alert message to the user.
When a tag is detected, the delegate method
tagReaderSession(_:didDetect:)is called:A
NfcChannelis created for the tag and session.The channel is wrapped in an
ApduChanneland aNbtCommandSetis created.The app connects to the tag, selects the application, and executes the ADT use case logic (read or write).
If the session is invalidated (e.g., user cancels or an error occurs),
tagReaderSession(_:didInvalidateWithError:)is called:The session is cleaned up.
The UI is updated with the appropriate state or message.
Session state and messages are published using
@Publishedproperties, allowing the UI to react to changes.