Webserver application
The NBT Cryptographic One-Time Token webserver application (view on GitHub) is a simple Python framework which showcases the OPTIGA™ Authenticate NBT in the brand protection with online authentication use case by making use of cryptographic one-time tokens (COTT).
Installation
Instructions to build the application, install and run it can be found
in the README.md file of its GitHub repository.
Software architecture
The example application enables users to perform an online validation of a product equipped with an OPTIGA™ Authenticate NBT via any internet-connected device capable to read NFC tags. The main purpose of this implementation is to showcase the OPTIGA™ Authenticate NBT’s capabilities to enable brand protection with online authentication and to provide a simple example on how to parse and validate cryptographic one-time tokens (COTT) as created by the OPTIGA™ Authenticate NBT.
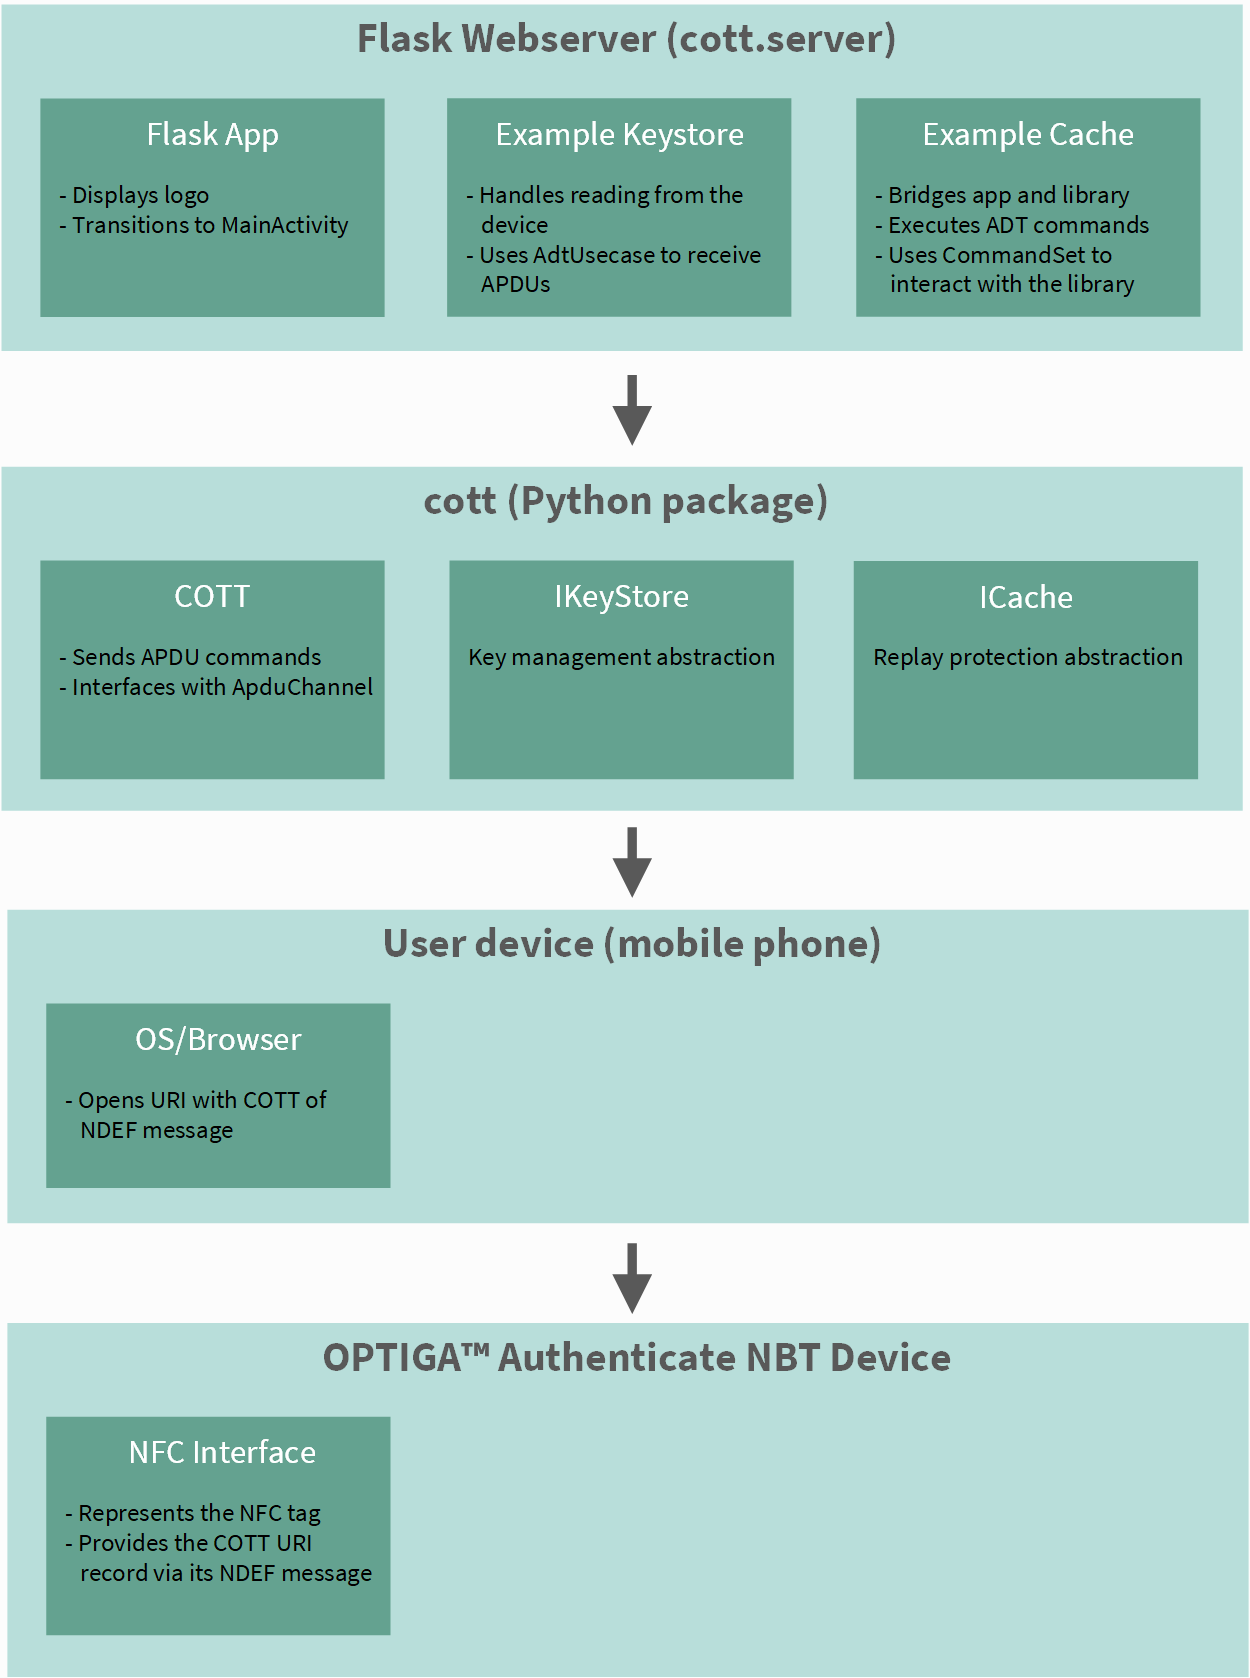
Fig. 34 High-level software architecture of the webserver application.
Components
cott (Python package)
Implements the core logic for parsing, decoding, and validating COTT tokens.
Provides abstractions such as cott.COTT for token handling, cott.IKeyStore for key management, and cott.ICache for replay protection.
Flask example webserver (`cott.server`)
Exposes a REST API for online validation of COTT tokens.
Main entry point is the create_app factory, which sets up the Flask application.
Example Keystore and Cache implementations
KeyStore: Dummy keystore, maps UIDs to AES keys for MAC validation. The default implementation returns a development key.
Cache: Tracks previously used COTT tokens to prevent replay attacks. Default is in-memory. This is not persistent and will not survive a server restart.
Application flow
The application flow is as follows:
A user scans an NFC tag and submits the COTT token to the webserver (usually via a mobile device).
The server decodes and parses the token, retrieves the corresponding AES key, and validates the MAC.
The server checks if the token has already been used (replay protection).
The result (valid/invalid/used) is rendered as an HTML page or returned as an HTTP response.
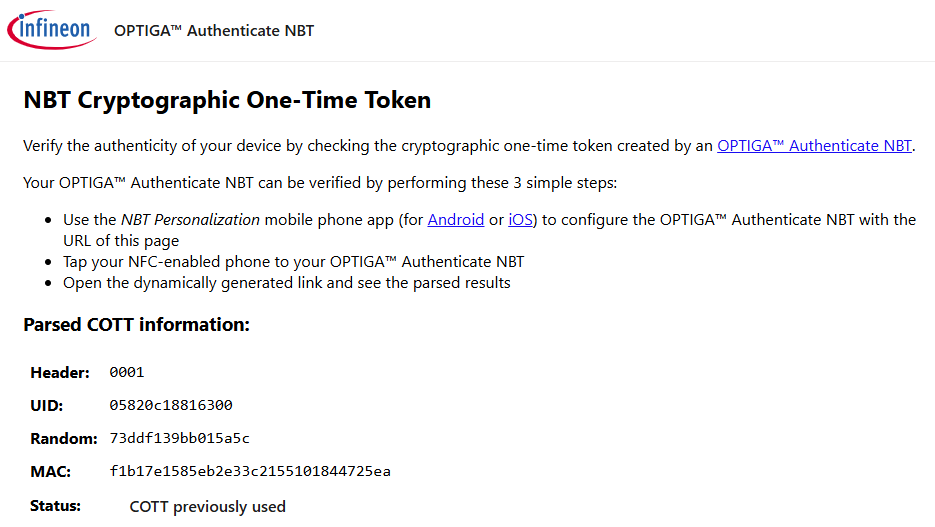
Fig. 35 Visualization of the webserver’s UI output.
Application details
This section provides details about various aspects of the application.
Project layout
The project is structured as a standard Python package with a modular layout for core logic, web server, documentation, and development tools.
The following is the directory structure of the project, highlighting the most important folders and files:
optiga-nbt-example-cott-flask/
├── .devcontainer/               # VS Code dev container configuration
│   ├── Dockerfile               # Dev container Dockerfile
│   └── devcontainer.json        # Dev container configuration file
├── .vscode/                     # VS Code workspace settings
│   └── settings.json            # VS Code project settings
├── docs/                        # Documentation for the project
├── LICENSES/                    # Third-party license files
├── src/                         # Source code root
│   └── cott/                    # Main Python package for COTT logic
│       ├── server/              # Flask web server implementation
│       │   ├── cache.py         # Cache implementations for replay protection
│       │   ├── keystore.py      # Keystore implementations for AES key management
│       │   ├── templates/       # HTML templates for web responses
│       │   │   └── index.html   # Template for valid token results
│       │   └── __init__.py      # Flask app factory and main endpoints
│       └── __init__.py          # Core COTT parsing, validation, and abstractions
├── tests/                       # Unit and integration tests
├── Dockerfile                   # Dockerfile for containerized deployment
├── MAINTAINERS.md               # Project maintainers information
├── openapi.yaml                 # OpenAPI specification for the REST API
├── README.rst                   # Project overview and quickstart
└── start_server.sh              # Script to start the Flask server
Parsing utilities
The parsing logic as well as the cryptographic validation is implemented in the base cott library:
import cott

# Parse Base64 token to more usable COTT object
token = cott.COTT.decode(b"AAECAwQFBgcICQoLDA0ODxDbq1lCP77Fp74yxIzhqA4z")

# Verify that COTT was created using known AES key
token.verify(bytes.fromhex("000102030405060708090a0b0c0d0e0f"))
The cott.COTT abstraction will give you access to the parsed fields of the token as well as additional utilities to en-/decode data.
print(f"UID: {token.uid.hex()}")
print(f"MAC: {token.mac.hex()}")
print(token.encode().hex())
Example REST server
The project offers a simple REST API via a Flask server.
This server offers a single root-level endpoint / that takes an HTTP query parameter cott that contains the Base64 encoded COTT as created by OPTIGA™ Authenticate NBT.
If you configure your OPTIGA™ Authenticate NBT with this server’s URL, the validation should work out of the box.
export FLASK_APP=cott.server
export FLASK_ENV=debug
flask run
The endpoint with its parsing and validation logic is implemented in cott.server.create_app().
It can help as a guide on how to parse the query parameter and use the cott library to validate the token.
The server offers extendable dummy implementations of a cott.IKeyStore as well as a cott.ICache.
The default cott.server.keystore.KeyStore does not rely on any database and returns the default key for the OPTIGA™ Authenticate NBT Development Kit or OPTIGA™ Authenticate NBT Development Shield no matter the provided UID.
If writing your own application, this keystore will need to be updated to handle concrete AES keys for different UIDs. These keys need to be protected so ensure that your database is properly secured.
The default cott.server.cache.Cache simply caches all previously received COTT values in memory. As long as the server is running, replay attacks will be detected. If it is restarted though, previous values will once again be allowed.
If implementing your own application, this cache needs to persist the COTT information in order to properly avoid replay attacks.
In addition, the webservice offers a health check endpoint under the /healthcheck path.
Dockerfile for the webserver application
To simplify the deployment of the REST API, a Dockerfile is provided that will automatically start the REST server.
docker build --tag "cott" .
docker run --publish 5000:5000 cott