CSDIDAC Middleware Library 2.10
CSDIDAC Middleware Library

The CSDIDAC middleware is the IDAC solution that uses the CSD HW block. Any GPIO that can be connected to AMUX-A/B (refer to the particular device datasheet for information) can be an CSDIDAC output under software control. The CSD HW block is mainly used to implement the touch sense applications and proximity sensors (refer to the CapSense Middleware API Reference Guide), but can also be used to implement the IDAC, which is especially useful for the devices that do not include another hardware option to implement IDAC.

Features:

  • A two-channel IDAC with the 7-bit resolution.
  • The IDAC A and IDAC B channels can be enabled/disabled independently.
  • The IDAC A and IDAC B channels can be configured with sourcing/sinking current independently.
  • The IDAC A and IDAC B channels can be joined to increase a maximum output current.
  • The IDAC A and IDAC B channels can be enabled/disabled simultaneously by using the CY_CSDIDAC_AB option.
  • The 0 to 609.6 uA (609600 nA) current range is available for each IDAC channel.
  • Each IDAC can use independently one of the six available LSB depending on a desired output current:
LSB IndexLSBAvailable Current Range
0 37.5 nA 0 to 4762.5 nA
1 75.0 nA 0 to 9525.0 nA
2 0.3 uA 0 to 38.1 uA
3 0.6 uA 0 to 76.2 uA
4 2.4 uA 0 to 304.8 uA
5 4.8 uA 0 to 609.6 uA

General Description

Include cy_csdidac.h to get access to all functions and other declarations in this library. The Quick Start Guide is offered in this API Reference Guide.

Refer to the Supported Software and Tools for the compatibility information.

Refer to the Changelog for the differences between the middleware versions. Changelog also describes the impact of changes to your code.

The CSD HW block enables the multiple sensing capabilities on PSoC devices including the self-cap and mutual-cap capacitive touch sensing solution, 10-bit ADC, IDAC, and Comparator. The CSD driver is a low-level peripheral driver, a wrapper to manage access to the CSD HW block. Any middleware access to the CSD HW block is through the CSD Driver.

The CSD HW block can support only one function at a time. However, all supported functionality (like CapSense, CSDADC, CSDIDAC, etc.) can be time-multiplexed in a design. I.e. you can save the existing state of the CapSense middleware, restore the state of the CSDIDAC middleware, perform DAC operations, and then switch back to the CapSense functionality. For more details and code examples, refer to the description of the Cy_CSDIDAC_Save() and Cy_CSDIDAC_Restore() functions.

capsense_solution.png
CapSense Solution

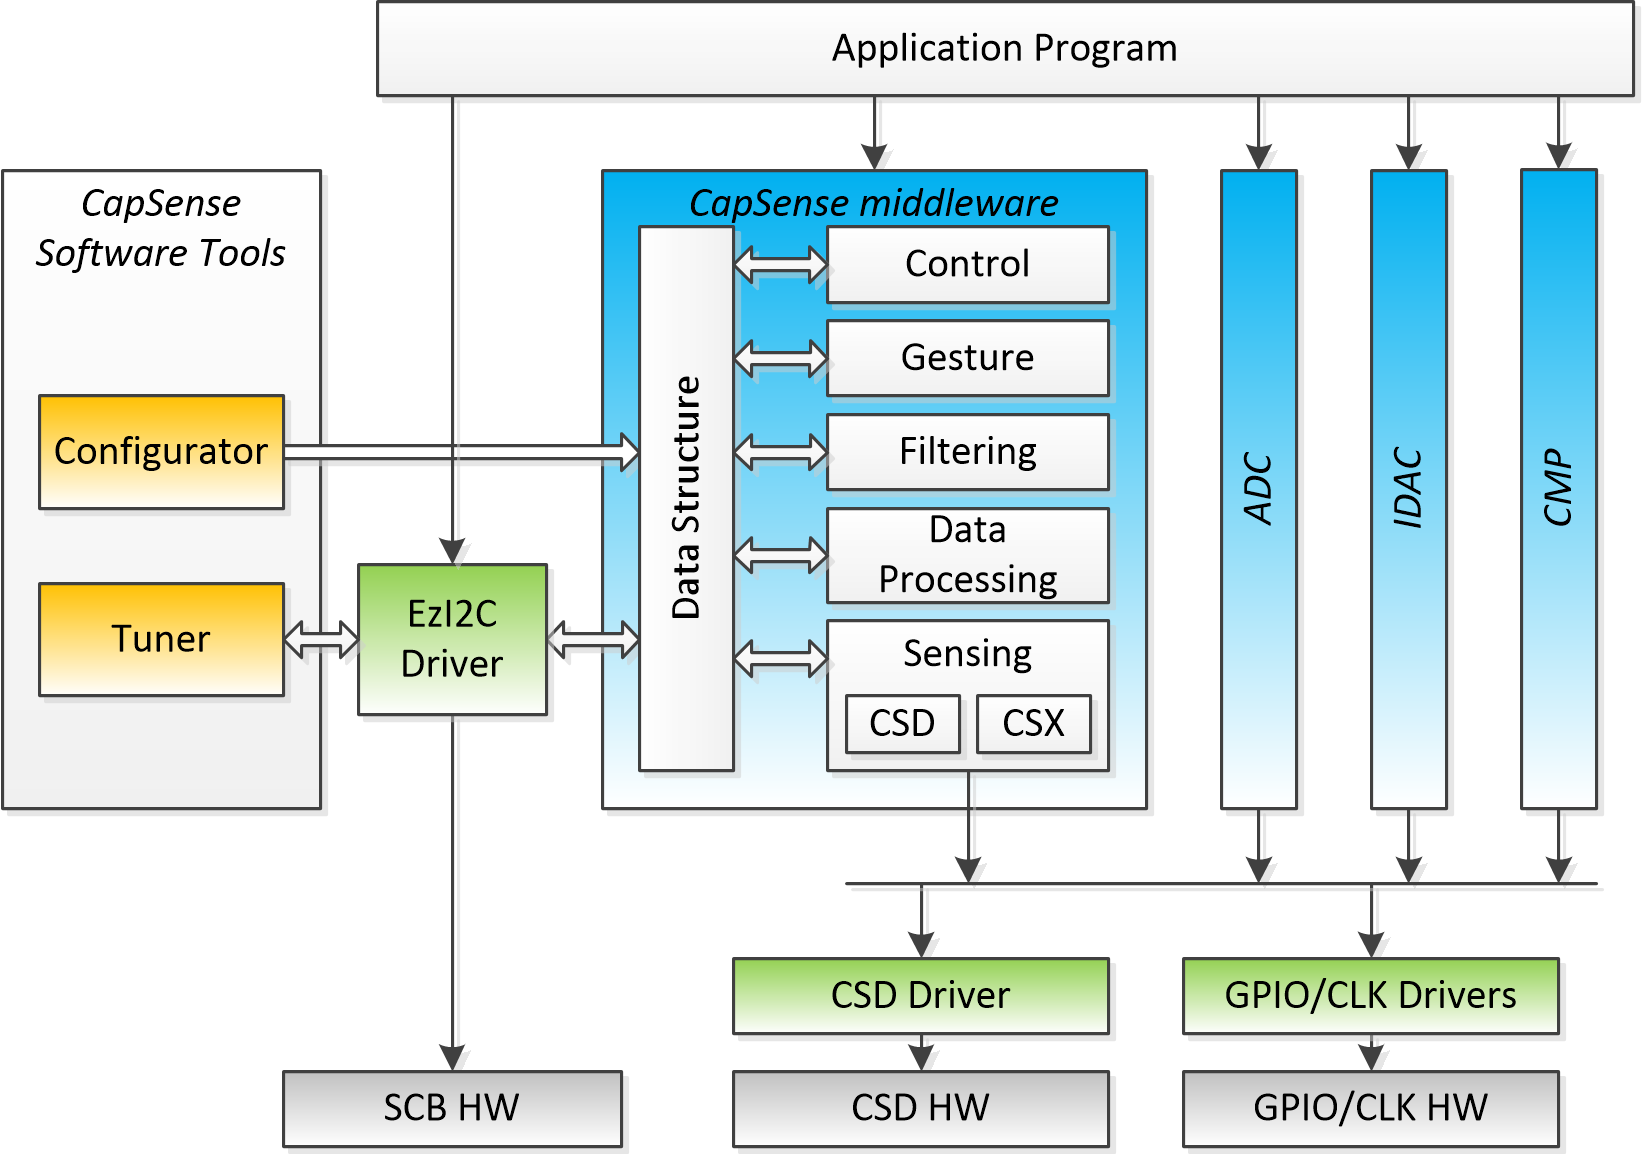
This section describes only the CSDIDAC middleware. Refer to the corresponding sections for documentation of other middleware supported by the CSD HW block. The CSDIDAC library is designed to be used with the CSD driver. The application program does not need to interact with the CSD driver and/or other drivers such as GPIO or SysClk directly. All of that is configured and managed by the middleware.

The Cy_CSDIDAC API is described in the following sections:

Quick Start Guide

The CSDIDAC middleware can be used in various Development Environments such as ModusToolbox, MBED, etc. Refer to the Supported Software and Tools. The quickest way to get started is using the Code Examples. The continually expanding portfolio of the code examples is available at the Cypress Semiconductor website and on GitHub.

This quick start guide assumes that the environment is configured to use the PSoC 6 Peripheral Driver Library(psoc6pdl) for development and the PSoC 6 Peripheral Driver Library(psoc6pdl) is included in the project.

The steps required to set up the CSDIDAC and get the desired current:

  1. Set up the CSDIDAC configuration manually or by using the Device Configurator as described in the Configuration Considerations section.
    Note
    Put the CSDIDAC name to the Alias field of the CSD resource if the Device Configurator is used.
  2. Include cy_csdidac.h to get access to all CSDIDAC API and cy_pdl.h to get access to API of peripheral drivers according to the example below:
    #include "cy_pdl.h"
    #include "cy_csdidac.h"
  3. If you use the MBED OS, include the cycfg.h file to get access to the System Configuration:
    #include "cycfg.h"
  4. Declare the 'cy_csdidac_context' variable as per example below:
    /* CSDIDAC context declaration */
    cy_stc_csdidac_context_t csdidac_context;
  5. Update the main() routine with the following code:
    /* UNCOMMENT THIS CODE if you use the MBED OS: */
    //init_cycfg_clocks();
    //init_cycfg_routing();
    //init_cycfg_peripherals();
    /* UNCOMMENT THIS CODE if you implement the initialization code manually
    * to assign the Peripheral Clock Divider to the CSD HW block
    * and to configure the divider value.
    */
    //#if defined(CY_IP_MXCSDV2)
    // Cy_SysClk_PeriphDisableDivider(CY_SYSCLK_DIV_8_BIT, 0u);
    // Cy_SysClk_PeriphAssignDivider(PCLK_CSD_CLOCK, CY_SYSCLK_DIV_8_BIT, 0u);
    // Cy_SysClk_PeriphSetDivider(CY_SYSCLK_DIV_8_BIT, 0u, 0u);
    // Cy_SysClk_PeriphEnableDivider(CY_SYSCLK_DIV_8_BIT, 0u);
    //#elif defined(CY_IP_M0S8CSDV2)
    // Cy_SysClk_PeriphDisableDivider(CY_SYSCLK_DIV_16_BIT, 0u);
    // Cy_SysClk_PeriphAssignDivider(PCLK_CSD_CLOCK, CY_SYSCLK_DIV_16_BIT, 0u);
    // Cy_SysClk_PeriphSetDivider(CY_SYSCLK_DIV_16_BIT, 0u, 0u);
    // Cy_SysClk_PeriphEnableDivider(CY_SYSCLK_DIV_16_BIT, 0u);
    //#else
    // #error Not supported device
    //#endif /* CY_IP_MXCSDV2 */
    /* UNCOMMENT THIS CODE if you implement the initialization code manually to
    * set configuration of the HSIOM_AMUX_SPLIT_CTL switches.
    * The AMUX bus has segments that are separated with the HSIOM_AMUX_SPLIT_CTL
    * switches. The code below closes the AMUX_SPLIT_CTL switches, which route
    * the IDAC output signal from the CSD block to the pin.
    * In this example, IDAC output channels are assigned to the P0[4] and P[5] pins.
    * The AMUX_SPLIT_CTL[5] and AMUX_SPLIT_CTL[6] switches must be closed in the
    * PSoC6 device. The P0[4] and P[5] pins in the PSoC4 device belong to the
    * AMUX bus segment, which is connected to the CSD block directly. In this case,
    * the AMUX_SPLIT_CTL switches are not closed.
    */
    //#if defined(CY_IP_MXCSDV2)
    //#if(1u == CY_IP_MXS40IOSS_VERSION)
    // HSIOM->AMUX_SPLIT_CTL[5] = HSIOM_AMUX_SPLIT_CTL_SWITCH_AA_SL_Msk |
    // HSIOM_AMUX_SPLIT_CTL_SWITCH_AA_SR_Msk |
    // HSIOM_AMUX_SPLIT_CTL_SWITCH_BB_SL_Msk |
    // HSIOM_AMUX_SPLIT_CTL_SWITCH_BB_SR_Msk;
    // HSIOM->AMUX_SPLIT_CTL[6] = HSIOM_AMUX_SPLIT_CTL_SWITCH_AA_SL_Msk |
    // HSIOM_AMUX_SPLIT_CTL_SWITCH_AA_SR_Msk |
    // HSIOM_AMUX_SPLIT_CTL_SWITCH_BB_SL_Msk |
    // HSIOM_AMUX_SPLIT_CTL_SWITCH_BB_SR_Msk;
    //#elif(2u == CY_IP_MXS40IOSS_VERSION)
    // HSIOM->AMUX_SPLIT_CTL[5] = HSIOM_V2_AMUX_SPLIT_CTL_SWITCH_AA_SL_Msk |
    // HSIOM_V2_AMUX_SPLIT_CTL_SWITCH_AA_SR_Msk |
    // HSIOM_V2_AMUX_SPLIT_CTL_SWITCH_BB_SL_Msk |
    // HSIOM_V2_AMUX_SPLIT_CTL_SWITCH_BB_SR_Msk;
    // HSIOM->AMUX_SPLIT_CTL[6] = HSIOM_V2_AMUX_SPLIT_CTL_SWITCH_AA_SL_Msk |
    // HSIOM_V2_AMUX_SPLIT_CTL_SWITCH_AA_SR_Msk |
    // HSIOM_V2_AMUX_SPLIT_CTL_SWITCH_BB_SL_Msk |
    // HSIOM_V2_AMUX_SPLIT_CTL_SWITCH_BB_SR_Msk;
    //#else
    // #error Not supported device
    //#endif
    //#endif
    /* Captures the CSD HW block and initializes it to the default state. */
    Cy_CSDIDAC_Init(&CSDIDAC_csdidac_config, &csdidac_context);
    /* Generates a sourcing current of 50 uA (50000 nA) on the IDAC A output. */
    Cy_CSDIDAC_OutputEnable(CY_CSDIDAC_A, 50000, &csdidac_context);
    /* Generates a sinking current of 0.5uA (-500 nA) on the IDAC B output. */
    Cy_CSDIDAC_OutputEnable(CY_CSDIDAC_B, -500, &csdidac_context);

Configuration Considerations

The CSDIDAC middleware operates on the top of the CSD Driver included in the PSoC 6 Peripheral Driver Library (psoc6pdl). Refer to the "CSD(CapSense Sigma Delta)" section of the PSoC 6 Peripheral Driver Library (psoc6pdl) API Reference Manual. This section guides how to set up the CSDIDAC middleware for the operation with the following parameters:

  1. Device VDDA: 3.3V.
  2. Device Peri Clock frequency: 48MHz.
  3. IDAC A is sourcing current of 50 uA to GPIO pin P0[4].
  4. IDAC B is sinking current of 0.5uA from GPIO pin P0[5].

There are two methods for the CSDIDAC Middleware configuration:

  1. Use ModusToolbox Device Configurator Tool to generate initialization code
  2. Implement the initialization code manually

Generation of the initialization code using the ModusToolbox Device Configurator Tool which is part of the ModusToolbox, greatly simplifies the PSoC configuration. The ModusToolbox Device Configurator Tool provides the user interface to set up and automatically generate the initialization code (including analog routing) and configuration structures.

Manual implementation of the initialization code (including analog routing) and configuration structures is recommended for expert Users only. This will include the code for the following settings which in case of the Device Configurator usage are generated automatically based upon the settings entered in its UI:

  • Assigning the Peripheral Clock Divider.
  • Configuring the HSIOM_AMUX_SPLIT_CTL switches to route signal from input pins configured as the CSDIDAC channels to the CSD HW block.
  • Declaration and initialization of the CSDIDAC configuration structure.
  • Declaration and initialization of the CSD HW driver context structure.
  • Definition of the of the CSD HW block base address.

Use ModusToolbox Device Configurator Tool to generate initialization code

The steps required to generate the initialization code using the ModusToolbox Device Configurator Tool :

  1. Launch the ModusToolbox Middleware Selector and enable the CSD IDAC middleware. This step is required only if the ModusToolbox IDE is used. Otherwise, ensure the CSDIDAC Middleware is included in your project.
  2. Launch the ModusToolbox Device Configurator Tool.
  3. Switch to the System tab. Configure the CLK_PERI frequency to achieve 48MHz (you may need to change the FLL or PLL frequency) and set the VDDA voltage to 3.3V in Power/MCU Personality.
  4. Switch to the Peripherals tab (#1 in the figure below). Enable the CSD personality under System (#2 in the figure below) and enter Alias (#3 in the figure below). We use CSDIDAC in Quick Start Guide.
  5. Go to the Parameters pane and configure the CSD Personality:
    • Assign the peripheral clock divider by using the Clock combo box(#4 in the figure below). Any free divider can be used.
    • Set the Enable CSDIDAC check box (#5 in the figure below).
    • Configure the CSDIDAC with the desired parameters per Configuration Considerations (#5 in the figure below).
    • Assign the CSDIDAC Channels to pins per Configuration Considerations (#6 in the figure below).
  6. Switch to the Peripheral Clocks tab and configure the assigned peripheral clock divider. The Max supported clock frequency for the CSD HW block is 50 MHz. The divider value "1" can be used, because in the current case the Peri Clock frequency is 48 MHz.
  7. Perform File->Save to generate the initialization code.
csdidac_config.png
CSDIDAC configuration

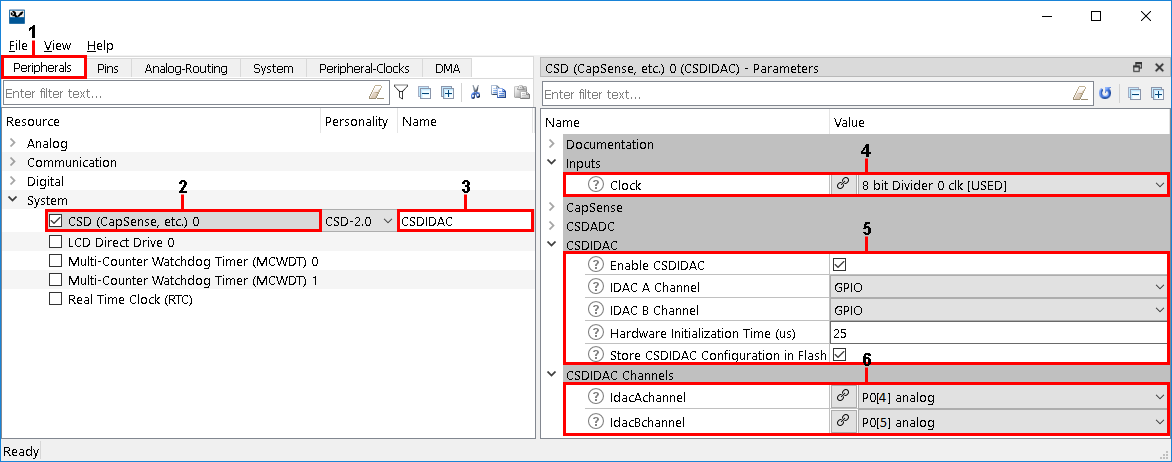
Now, all required CSDIDAC initialization code and configuration prerequisites will be generated:

  • The Peripheral Clock Divider assignment and analog routing are parts of the init_cycfg_all() routine. Place the call of the init_cycfg_all() function before using any CSDIDAC API functions to ensure initialization of all external resources required for the CSDIDAC operation. Refer to the main() routine code snippet in Quick Start Guide
  • The CSDIDAC configuration structure declaration in the cycfg_peripherals.h file and its initialization in the cycfg_peripherals.c file. The variable name is <Alias_Name>_csdidac_config.
  • The CSD HW driver context structure declaration in the cycfg_peripherals.h file and its initialization in the cycfg_peripherals.c file. The variable name is cy_csd_<CSD_Block_Index>_context.
  • The CSD HW block base address definition is in the cycfg_peripherals.h file. The definition name is <Alias_Name>_HW.

The generated code will be available under the GeneratedSource folder.

Refer to Quick Start Guide section for the application layer code required to set up the CSDIDAC and to get the desired current on the assigned pin.

Implement the initialization code manually

The steps required to implement the initialization code manually:

  1. Launch the ModusToolbox Middleware Selector and enable the CSD IDAC middleware. This step is required only if the ModusToolbox IDE is used. Otherwise, ensure the CSDIDAC Middleware is included in your project.
  2. Define the CSD HW block base address. See the code example below:
    #define CSDIDAC_HW (CSD0)
  3. Declare the CSD HW driver context structure and initialize the lockKey field with the CY_CSD_NONE_KEY value. See the code example below:
    cy_stc_csd_context_t csdDriverContext =
    {
    .lockKey = CY_CSD_NONE_KEY, /* Initialization of the lockKey with the CY_CSD_NONE_KEY
    is required */
    };
  4. Declare the CSDIDAC configuration structure and initialize it according to the desired parameters. See the code example below:
    /* Assign the IDAC A channel to P0[4] */
    static const cy_stc_csdidac_pin_t csdIdacAPin =
    {
    .ioPcPtr = GPIO_PRT0,
    .pin = 4u,
    };
    /* Assign the IDAC B channel to P0[5] */
    static const cy_stc_csdidac_pin_t csdIdacBPin =
    {
    .ioPcPtr = GPIO_PRT0,
    .pin = 5u,
    };
    const cy_stc_csdidac_config_t CSDIDAC_csdidac_config =
    {
    .base = CSDIDAC_HW, /* The CSD0 HW block is selected for CSDIDAC operation. */
    .csdCxtPtr = &csdDriverContext, /* Points to the CSD driver context structure. */
    .configA = CY_CSDIDAC_GPIO, /* Routes the IDAC A output to the pin. */
    .configB = CY_CSDIDAC_GPIO, /* Routes the IDAC B output to the pin. */
    .ptrPinA = (const cy_stc_csdidac_pin_t *) &csdIdacAPin, /* Points to the structure with configured IDAC A Port/Pin. */
    .ptrPinB = (const cy_stc_csdidac_pin_t *) &csdIdacBPin, /* Points to the structure with configured IDAC B Port/Pin. */
    .cpuClk = 48000000u, /* Provides the absolute CPU clock frequency in the current design (configured to 48MHz). */
    #if defined(CY_IP_MXCSDV2)
    .csdInitTime = 25u, /* Configures the CSD0 wake-up initialization time to 25 us (as default) for the PSoC 6 device. */
    #else
    .csdInitTime = 10u, /* Configures the CSD0 wake-up initialization time to 10 us (as default) for the PSoC 4 device. */
    #endif /* CY_IP_MXCSDV2 */
    };
  5. Assign the Peripheral Clock Divider to the CSD HW block and configure the divider value. See the code example below and refer to the main() routine code snippet in Quick Start Guide
    /*
    * The code below performs the following operations:
    * 1. Disable the Peripheral Clock Divider with index #0 before it
    * is assigned to the CSD HW block.
    * 2. Assign the Peripheral Clock Divider with index #0 to the CSD HW block.
    * 3. Configure the assigned divider with divider value 0 (to divide by 1).
    * 4. Enable the assigned divider.
    *
    * PCLK_CSD_CLOCK - Connects the divider to the CSD HW block
    * CY_SYSCLK_DIV_8_BIT - Uses the 8-bit divider. This divider is to
    * limit the CSD clock frequency to 50 MHz. The Peri Clock frequency
    * is 48 MHz (refer to the Configuration Considerations section), so the divider
    * value is 0 (to divide by 1). No need for a wider divider type.
    *
    * 0 = select divider with index #0.
    */
    #if defined(CY_IP_MXCSDV2)
    Cy_SysClk_PeriphDisableDivider(CY_SYSCLK_DIV_8_BIT, 0u);
    Cy_SysClk_PeriphAssignDivider(PCLK_CSD_CLOCK, CY_SYSCLK_DIV_8_BIT, 0u);
    Cy_SysClk_PeriphSetDivider(CY_SYSCLK_DIV_8_BIT, 0u, 0u);
    Cy_SysClk_PeriphEnableDivider(CY_SYSCLK_DIV_8_BIT, 0u);
    #elif defined(CY_IP_M0S8CSDV2)
    Cy_SysClk_PeriphDisableDivider(CY_SYSCLK_DIV_16_BIT, 0u);
    Cy_SysClk_PeriphAssignDivider(PCLK_CSD_CLOCK, CY_SYSCLK_DIV_16_BIT, 0u);
    Cy_SysClk_PeriphSetDivider(CY_SYSCLK_DIV_16_BIT, 0u, 0u);
    Cy_SysClk_PeriphEnableDivider(CY_SYSCLK_DIV_16_BIT, 0u);
    #else
    #error Not supported device
    #endif /* CY_IP_MXCSDV2 */
  6. Set the configuration of the HSIOM_AMUX_SPLIT_CTL switches to route signal from CSD HW block to the pins configured as the CSDIDAC output channels.

    The AMUX bus has segments that are separated with the HSIOM_AMUX_SPLIT_CTL switches. The code below closes the AMUX_SPLIT_CTL switches, which route the IDAC output signal from the CSD block to the pin. In this example, IDAC output channels are assigned to the P0[4] and P[5] pins. The AMUX_SPLIT_CTL[5] and AMUX_SPLIT_CTL[6] switches must be closed in the PSoC6 device. The P0[4] and P[5] pins in the PSoC4 device belong to the AMUX bus segment, which is connected to the CSD block directly. In this case, the AMUX_SPLIT_CTL switches are not closed. Refer to the Technical Reference Manual (TRM) for more information regarding the analog interconnection. See the code example below and refer to the main() routine code snippet in Quick Start Guide

    #if defined(CY_IP_MXCSDV2)
    #if(1u == CY_IP_MXS40IOSS_VERSION)
    HSIOM->AMUX_SPLIT_CTL[5] = HSIOM_AMUX_SPLIT_CTL_SWITCH_AA_SL_Msk | /* Closes the left AMUX-A switch of AMUX splitter #5. */
    HSIOM_AMUX_SPLIT_CTL_SWITCH_AA_SR_Msk | /* Closes the right AMUX-A switch of AMUX splitter #5. */
    HSIOM_AMUX_SPLIT_CTL_SWITCH_BB_SL_Msk | /* Closes the left AMUX-B switch of AMUX splitter #5. */
    HSIOM_AMUX_SPLIT_CTL_SWITCH_BB_SR_Msk; /* Closes the right AMUX-B switch of AMUX splitter #5. */
    HSIOM->AMUX_SPLIT_CTL[6] = HSIOM_AMUX_SPLIT_CTL_SWITCH_AA_SL_Msk | /* Closes the left AMUX-A switch of AMUX splitter #6. */
    HSIOM_AMUX_SPLIT_CTL_SWITCH_AA_SR_Msk | /* Closes the right AMUX-A switch of AMUX splitter #6. */
    HSIOM_AMUX_SPLIT_CTL_SWITCH_BB_SL_Msk | /* Closes the left AMUX-B switch of AMUX splitter #6. */
    HSIOM_AMUX_SPLIT_CTL_SWITCH_BB_SR_Msk; /* Closes the right AMUX-B switch of AMUX splitter #6. */
    #elif(2u == CY_IP_MXS40IOSS_VERSION)
    HSIOM->AMUX_SPLIT_CTL[5] = HSIOM_V2_AMUX_SPLIT_CTL_SWITCH_AA_SL_Msk | /* Closes the left AMUX-A switch of AMUX splitter #5. */
    HSIOM_V2_AMUX_SPLIT_CTL_SWITCH_AA_SR_Msk | /* Closes the right AMUX-A switch of AMUX splitter #5. */
    HSIOM_V2_AMUX_SPLIT_CTL_SWITCH_BB_SL_Msk | /* Closes the left AMUX-B switch of AMUX splitter #5. */
    HSIOM_V2_AMUX_SPLIT_CTL_SWITCH_BB_SR_Msk; /* Closes the right AMUX-B switch of AMUX splitter #5. */
    HSIOM->AMUX_SPLIT_CTL[6] = HSIOM_V2_AMUX_SPLIT_CTL_SWITCH_AA_SL_Msk | /* Closes the left AMUX-A switch of AMUX splitter #6. */
    HSIOM_V2_AMUX_SPLIT_CTL_SWITCH_AA_SR_Msk | /* Closes the right AMUX-A switch of AMUX splitter #6. */
    HSIOM_V2_AMUX_SPLIT_CTL_SWITCH_BB_SL_Msk | /* Closes the left AMUX-B switch of AMUX splitter #6. */
    HSIOM_V2_AMUX_SPLIT_CTL_SWITCH_BB_SR_Msk; /* Closes the right AMUX-B switch of AMUX splitter #6. */
    #else
    #error Not supported device
    #endif /* (1u == CY_IP_MXS40IOSS_VERSION) */
    #endif /* CY_IP_MXCSDV2 */
    Note
    If you use a KIT, check on the schematics, if pins P0[4] and P0[5] are free. If not, use some other pins and update the AMUX_SPLIT_CTL registers.
    Some CSDIDAC configurations are restricted. The CSD personality has a mechanism to prevent writing an invalid configuration. If CSDIDAC is manually created, avoid the following combinations:
    • both IDAC channels are disabled
    • one IDAC channel is disabled and another channel is joined to it
    • the IDAC A channel and IDAC B channel are joined to each other

    Refer to Quick Start Guide section for the application layer code required to set up the CSDIDAC and to get the desired current on the assigned pin.

Use Cases

This section provides descriptions and links to additional documentation for some specific CSDIDAC use cases.

Low power design

The CSD HW block and CSDIDAC middleware can operate in CPU active and CPU sleep power modes. It is also possible to switch between low power and ultra low power system modes. In System Deep Sleep and Hibernate power modes, the CSD HW block is powered off and CSDIDAC operations are not performed. Before entering CPU / System Deep Sleep, disable CSDIDAC output current generation. If output currents are not disabled, a CPU Deep Sleep transition will fail. When the device wakes up from CPU / System Deep Sleep, the CSD HW block resumes operation without the need for re-initialization and the CSDIDAC operations can be continued with configuration that was set before a CPU / System Deep Sleep transition. When the device wakes up from Hibernate power mode, the CSD HW block does not retain the configuration and CSDIDAC requires re-initialization.

Note
  1. Analog start up time for the CSD HW block is 25 us for PSoC6 devices and 10 us for PSoC4 devices. Initiate any kind of operation only after 25 us for PSoC6 devices and 10 us for PSoC4 devices from System Deep Sleep / Hibernate exit.
  2. Entering CPU Deep Sleep mode does not mean the device enters System Deep Sleep. For more detail about switching to System Deep Sleep, refer to the device TRM.

Refer to the Cy_CSDIDAC_DeepSleepCallback() function description and to the SysPm (System Power Management) driver documentation for the low power design considerations.

Sleep mode
The CSD HW block can operate in CPU sleep mode. The user can start CSDIDAC and move CPU into sleep mode to reduce power consumption. After wake-up CPU from sleep, the user can perform other operations, e.g. disable IDACs. Then, the user configures the CSDIDAC middleware as described in Configuration Considerations, and updates the main() routine with the following code:

/* Scenario: There is a need to generate two output currents while CPU is in Sleep mode. */
/* ... */
for (;;)
{
/* Starts CSDIDAC generation of two output currents. */
if (CY_CSDIDAC_SUCCESS != Cy_CSDIDAC_OutputEnable(CY_CSDIDAC_A, 50000, &csdidac_context))
{
/* You can place error handler code here. */
}
if (CY_CSDIDAC_SUCCESS != Cy_CSDIDAC_OutputEnable(CY_CSDIDAC_B, -500, &csdidac_context))
{
/* You can place error handler code here. */
}
/*
* Goes to CPU Sleep mode and waits for an interrupt (or another wake-up event).
* It is the user's responsibility to provide an interrupt source for a reliable CPU wake-up.
*/
if(CY_SYSPM_SUCCESS != Cy_SysPm_CpuEnterSleep(CY_SYSPM_WAIT_FOR_INTERRUPT))
{
/* You can place error handler code here. */
}
/*
* Insert here code to perform after Sleep mode operations, e.g. to disable IDACs.
*/
}

Deep Sleep mode
To use the CSDIDAC middleware in CPU / System Deep Sleep mode, the user configures a wake-up source (e.g. a pin, WDT, LPC or another entities, that are active in CPU / System Deep Sleep mode), configures the CSDIDAC middleware as described in Configuration Considerations, configures CSDIDAC and other drivers' and middleware's (if present) Deep Sleep Callback structures, registers callbacks, and updates the main() routine with the following code:

/* CSDIDAC DeepSleep Callback parameters structure */
cy_stc_syspm_callback_params_t CSDIDAC_deepSleepParamStr =
{
CSDIDAC_HW, /* Points to the CSD HW block base */
&csdidac_context, /* Points to the CSDIDAC context structure */
};
/* CSDIDAC DeepSleep Callback structure */
cy_stc_syspm_callback_t CSDIDAC_deepSleepCallbackStr =
{
&Cy_CSDIDAC_DeepSleepCallback, /* Points to the CSDIDAC Callback function */
CY_SYSPM_DEEPSLEEP, /* The Callback type */
0u, /* The skip modes mask */
&CSDIDAC_deepSleepParamStr, /* Points to the Callback parameters structure */
NULL, /* Reserved */
10u, /* The callback priority, can be from 1 (the highest) to 255 (the lowest)*/
};
/*
* Scenario: There is a need to generate two output currents and use them for some operations,
* and then go to Deep Sleep with wake-up on some event.
*/
/* ... */
/* Registers CSDIDAC DeepSleep Callback. */
if (true != Cy_SysPm_RegisterCallback(&CSDIDAC_deepSleepCallbackStr))
{
/* You can place error handler code here. */
}
/* ... */
for (;;)
{
/* Starts CSDIDAC generation of two output currents. */
if (CY_CSDIDAC_SUCCESS != Cy_CSDIDAC_OutputEnable(CY_CSDIDAC_A, 50000, &csdidac_context))
{
/* You can place error handler code here. */
}
if (CY_CSDIDAC_SUCCESS != Cy_CSDIDAC_OutputEnable(CY_CSDIDAC_B, -500, &csdidac_context))
{
/* You can place error handler code here. */
}
/*
* Insert here code to use generated currents.
*/
/* Disables CSDIDAC generation to allow a Deep Sleep transition. */
{
/* You can place error handler code here. */
}
/*
* Then CPU goes to Deep Sleep and waits for an interrupt (or another wake-up event).
* It is the user's responsibility to provide an interrupt source for a reliable CPU wake-up.
*/
#if defined(CY_IP_MXCSDV2)
if(CY_SYSPM_SUCCESS != Cy_SysPm_CpuEnterDeepSleep(CY_SYSPM_WAIT_FOR_INTERRUPT))
{
/* You can place error handler code here. */
}
#elif defined(CY_IP_M0S8CSDV2)
if(CY_SYSPM_SUCCESS != Cy_SysPm_SystemEnterDeepSleep(CY_SYSPM_WAIT_FOR_INTERRUPT))
{
/* You can place error handler code here. */
}
#else
#error Not supported device
#endif /* CY_IP_MXCSDV2 */
/* Wakes up CSDIDAC after a successful exit from Deep Sleep. */
if (CY_CSDIDAC_SUCCESS != Cy_CSDIDAC_Wakeup(&csdidac_context))
{
/* You can place error handler code here. */
}
/*
* After Deep Sleep, CPU and CSD HW block wake-up, CSDIDAC can generate
* two output currents, as it was configured before transitions.
*/
/* ... */
}

Time-multiplexing operation

Refer to the CapSense Middleware API Reference Guide for implementation of the time-multiplexing operation by using common CSD HW block.

Supported Software and Tools

This version of the CSDIDAC Middleware was validated for compatibility with the following Software and Tools:

Software and Tools Version
ModusToolbox Software Environment 2.1
- ModusToolbox Device Configurator 2.1
- ModusToolbox CSD Personality for PSoC4 devices in Device Configurator 1.0
- ModusToolbox CSD Personality for PSoC6 devices in Device Configurator 2.0
PSoC4 Peripheral Driver Library (PDL) 1.0.0
PSoC6 Peripheral Driver Library (PDL) 1.5.0
GCC Compiler 7.2.1
IAR Compiler 8.32
Arm Compiler 6 6.11
MBED OS (only for PSoC6) 5.15.1
FreeRTOS 10.0.1

Update to Newer Versions

Consult Changelog to learn about the design impact of the newer version. Set up your environment in accordance with Supported Software and Tools. You might need to re-generate the configuration structures for either the device initialization code or the middleware initialization code.

Ensure:

  • The specified version of the ModusToolbox Device Configurator and the CSD personality are used to re-generate the device configuration.
  • The toolchains are set up properly for your environment per the settings outlined in the Supported Software and Tools.
  • The project is re-built once the the toolchains are configured and the configuration is completed.

MISRA-C Compliance

The Cy_CSDIDAC library has the following specific deviations:

MISRA Rule Rule Class (Required/Advisory) Rule Description Description of Deviation(s)
11.4 A Do not perform a conversion between the pointer to an object and an integer type. Such a conversion is performed with CSDIDAC context in the DeepSleepCallback() function. This case is verified on correct operation.
1.2 R Constant: De-reference of the NULL pointer. These violations are reported as a result of using offset macros of the CSD Driver with corresponding documented violation 20.6. Refer to the CSD Driver API Reference Guide.
20.3

Changelog

VersionChangesReason for Change
2.10 Added the support of PSoC 4 CapSense Forth Generation devices Devices support
Minor documentation update Documentation cleanup
2.0 The joining two IDAC channels option is added to increase the maximum CSDIDAC output current Feature enchancement
The cy_stc_csdidac_config_t structure is changed: the periClk field replaced with cpuClk, busOnlyA and busOnlyB fields replaced with configA and configB fields respectively, the field order is changed. The cy_en_csdidac_channel_config_t enumeration type is added. User experience improvement
The CY_CSDIDAC_HW_FAILURE and the CY_CSDIDAC_BAD_CONFIGURATION return status cases are added to the cy_en_csdidac_status_t enumeration type User experience improvement
The CY_CSDIDAC_AB choosing case for both IDACs is added to the cy_en_csdidac_choice_t enumeration type Feature enchancement
The CSDIDAC MW sources are enclosed with the conditional compilation to ensure a successful compilation for non-CapSense-capable devices Compilation for non-CapSense-capable devices
1.0 The initial version

More Information

Important information about the CapSense-technology overview, appropriate device for the design, CapSense system and sensor design guidelines, different interfaces and tuning guidelines necessary for a successful design of a CapSense system is available in the Getting Started with CapSense document and the product-specific CapSense design guide. It is highly recommended to start with these documents. They can be found at www.cypress.com.

For more information, refer to the following documents:

Note
The links to another software component's documentation (middleware and PDL) point to GitHub to the latest available version of the software. To get documentation of the specified version, download from GitHub and unzip the component archive. The documentation is available in the docs folder.